The Users tab displays the defined users, their Status of enabled or disabled, and an indication of whether they are a member of each role.
The default set of users defined for each product may vary.
The admin user name is defined to have access to all actions for all resources. This can not be changed.
Defining a user
- To define a new user, click New.
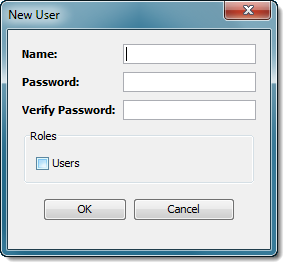
The New User window is displayed. - Enter the Name, Password and Verify Password parameters, and then select the checkbox for each role the user will have.
- Click OK when done.
Users can be defined with no roles, but they will not be able to use the Workbench to access any of the node's resources.
Managing users
-
With one user selected, use Edit to change a user's password and roles.
The Edit User window will appear, with the same layout as the New User window.
Editing the password is not required if you only want to change role settings.
-
With multiple users selected, use Edit to modify user roles of multiple users.
The Edit User Roles window will be displayed.
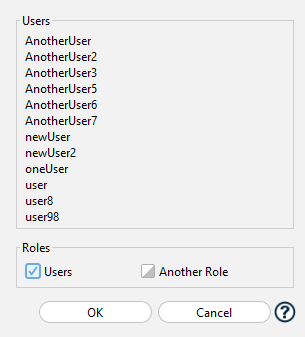
The list of users will be shown along with the state of the role for each:
- Checked - all users have this role
- Unchecked - no users have this role
- Indeterminate - some users have it, some do not
You may edit what is selected; any role that starts indeterminate will cycle through the three states.
Any role that starts checked or unchecked can only be set to checked or unchecked.
Setting a role in the indeterminate state means that role will not be modified for any user.
-
For any number of selected users:
- Delete will delete the user(s) from the node's definitions.
- Enable and Disable are used to change user Status.
An enabled user is active and will have access to resources defined by its roles and the enabled policies.
A disabled user will not be able to connect to the node.
Exporting and Importing User Definitions
The context menu in this panel has four options for importing or exporting user definitions.
- Export - Export user definitions to a .dwx file
- Import - Import user definitions from a previously exported .dwx file
- Export to csv - Export user definitions to a .csv file where the columns are:
- User name - name of the user
- Password - placeholder for password, will always be blank
- Roles... - multiple columns for each role the user has
For example, if a user named "MyUser" has the roles of "user", "viewer", and "editor", the row in the csv export would look like:
MyUser,,user,viewer,editor - Import from csv - Import user definitions from a csv file with the format as shown above.
It is recommended you do an export of existing users to view the format and use that as a template if you want to define more users in a csv file to be imported.
The only required column for a row is the user name. Importing this will result in a user with no roles set.
If the password column is left blank or there is only the user name column, the user's password will be set to their name.
A password value can be included in the csv but it is recommended any file with such information be kept secure and deleted once the import has been done.
The remaining columns will be the roles for the user. If a role does not exist it will be created.
Changing your password
For the user currently logged on to a node, there is an alternative way to change your password, as follows:
-
Instead of using the Administration Security tab and then the Users tab, right-click on the node's icon in the left-hand pane Nodes list to display the node's pop-up menu.

-
Select Change password.
A Change Password window is displayed
-
Enter your current password in the Current Password field as well as the new password in both the New Password and Verify Password parameters and select OK.