Deploying the XML file
This section describes how to deploy the XML file so that
it becomes available as a device type from the Workbench
Devices feature.
Putting the file in the Staging Browser
In order for the vendor specific XML Modbus file to become available from the Workbench > Devices feature as a Modbus device, you must transfer the file from your external location to the modbus folder in the Staging Browser file system.
Follow these steps:
- From the Workbench left pane, expand the
appropriate node whose Staging Browser you want to copy
the XML file to.
- Select Administration.
The Administration window appears with a set of tabs. Select the Staging Browser tab.
- From the Staging Browser tab,
right-click the modbus folder to
display its pop-up menu, and then select
Put.
The Select Files window appears. - Change to the location where the file resides, and
then select the file.
The name of the file is added to the FileName box. - Click Select.
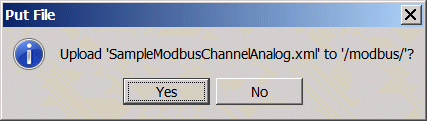
- A message will ask you if you want to upload the
selected file. Select Yes.
- Another message will tell you that the file was
uploaded to the target folder. Select
OK.
The file is copied to the node and appears in the modbus folder.
Restarting the node
The runtime process running on this node will have to be restarted to allow the new Modbus device type to become available.
- From the Workbench left pane, select
Administration.
The Administration window appears with a set of tabs. - Select the Node Administration
tab.

- From the the bottom of the tab, select
Restart.
A Restart window appears. - Select Restart Runtime.
Specifying the XML device type
Once the node is restarted, you will be able to create a
device using the new device type from the Devices
window.
- From the bottom of the Devices
tab, select New.
The Device window appears. - Name the device.

- From the Type parameter, under the
Modbus category, select the new XML
device type.
- After you have filled in each parameter, select
Validate.
An attempt to communicate with the physical device will be initiated. A message will say whether or not the validation was successful. - If no errors are received, select Save.
The new XML device is added to the
Devices tab. By default, the new device is
stopped.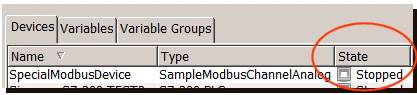
The next step is to start the device.
Starting the Modbus device
Follow these steps:
- From the Devices tab, select the
new XML device, display its pop-up menu, and then
select Start.
- The State column for the device is
changed to Started.
When the device is started, you will be able to access the internal device variables that you specified using the VariableInfo tag. - Select the Variables tab.

- Select the plus sign to expand the list of device
variables.
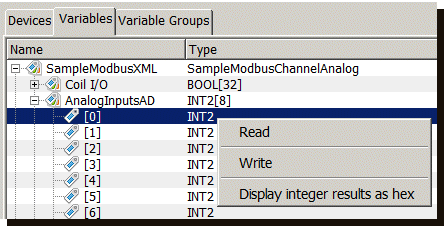
There are also pop-up menus with options according to the data type and the type of access you set for the individual device variable using the options= attribute on the VariablesInfo tag.
Editing the XML
Modifications can be made to existing XML files and do not require that you restart the node. Those changes will take effect for existing Modbus devices, the next time the device is started. Here is the process:
- Make changes in the XML file.
- Verify the XML file is correct.
- Go to the Devices tab and stop the
device.
- Put the file on the Staging Browser in the
modbus folder.
- Go to the Devices tab and start the device.