Connecting with deviceWISE OPC UA Client using Message Security Mode
- Copy the OPC UA Client private key from the deviceWISE installation folder ./certs/uaclient/uaclientkey.nopass.pem into the Staging directory under /uaclient/pki/own/uaclientkey.nopass.pem
- Set up an OPC UA Client device with the following settings:
Authentication Settings - Choose the certificate
X.509 Certificate – Choose the certificate file (*.der,*.cer) to be trusted on the server. The certificate for the deviceWISE OPC UA Client is found in the Staging directory at /uaclient/pki/own/uaclientcert.der.
Private Key – Choose the deviceWISE OPC UA Client private key found at /uaclient/pki/own/uaclientkey.nopass.pem (see step 1)
Security Policy – Choose Basic256Sha256
Message Security Mode – Choose Sign and Encrypt

- Click Validate
If you get an error stating “Certificate untrusted”:
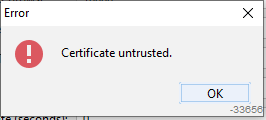
Go to the deviceWISE \staging\uaclient\pki\rejected directory.
You will see the certificate from the server rejected by the OPC UA Client on device definition validation.
Move the file to the \staging\uaclient\pki\trusted\certs.
-
Open the deviceWISE device definition and click Validate again.
If you get an error stating that the “Certificate security checks failed”:
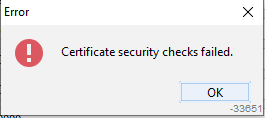
Open the OPC UA Server configuration. Select the client certificate and click Trust. Depending on the OPC UA Server you are using, you may need to restart it to apply the change.

-
Open the deviceWISE device definition and click Validate again.

On the server where the OPC UA Server is running, move the deviceWISE UA Client certificate from ../ProgramData/{opc ua server application name}/pkiuser/rejected/certs to ../ProgramData/{opc ua server application name}/pkiuser/trusted/certs on the server.
The device definition should now be able to Validate properly.