This page describes the following:
- How to use XML Schema Definition (XSD) files to create a listener map. A sample XSD file is provided to help you get started with creating a listener map with an XSD payload.
- How to create a trigger that uses a listener event and writes the XML tag values to variables.
Overview
The XSD listener map is used when XML messages received by a listener need to be parsed using an XML Schema.
The XSD payload type is available to be selected only when the corresponding listener is defined to accept XSD. For more information, see Listener XSD format.
XSD limitations
Make sure you review XSD limitations before you begin creating a listener map.
Assumptions
The following is assumed:
- You are familiar with the XML Schema Definition language.
- You know how to use the Workbench and create triggers.
- There is a listener with an XSD payload defined on the node. For more information, click Listener XSD format
- If the XML Schema has import statements, then all referenced XSDs are available to be accessed from the Workbench.
Downloading the sample XSD file
Download this sample file, and note the folder where it is stored.
Sample file
The file will look like this: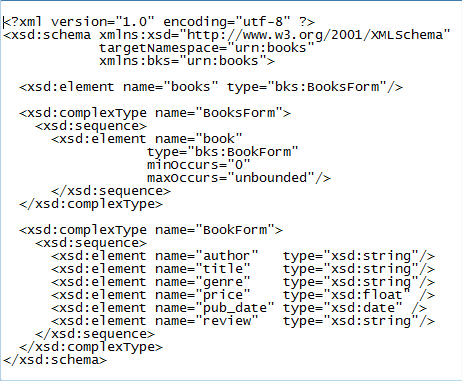
Example listener with XSD payload
The following shows a completed Listener window with TCP
as the listener type and XSD as the payload format.
Once the listener is saved and available on the node, you can create the listener map.
Rendering the XSD in the listener map
The following will walk you through creating a listener map to process XML data that will be written to variables. The sample XSD file will referenced within the instructions.
- From the Workbench left pane, expand the node that you want to add the listener map to.
- Expand Enterprise, right-click the
Listener Maps icon to display its
pop-up menu, and then click New.
The default Listener Map window appears.
- In the Name field, type a unique name for the listener map.
- Use the Listener Type down arrow to filter the listeners displayed by type in the Listener Name list. For example, the list might include TCP, JMS, or XSD.
- Select the Listener Name down arrow to display a list of
previously defined listeners, and then select the
appropriate listener that supports the XSD
payload.
The From Enterprise section of the listener map window changes to accommodate an XSD format.
Step 1: Specifying the location of the XSD file
Consider the following when specifying a value for the XSD File text field:
- If the XSD is located on a web server, type a URL starting with http(s) in the XSD File field.
- If the XSD file is available on the local file system and you know the location and name of the file, you can type the full path and name into the XSD File field. For example, C:/path/xsdfilename.xsd.
- If you do not know the exaction location of the file, select the browse button. This brings up a file chooser dialog to help you navigate to the XSD file. Locate your XSD file and select it. The XSD File field is populated with the name.
Once you have added a value in the XSD File field, select the Query button.
Assuming the XSD is valid and contains at least one element, the Root Element parameter becomes populated with elements found in the XSD file.
Step 2: Displaying the XSD element structure
Use the Root Element down-arrow, and then select the appropriate element from the list.
The XSD structure is displayed at the bottom of the From Enterprise section of the listener map window.
The XSD structure appears as follows:
- XSD elements nested in other XSD elements, such as elements belonging to complex types, appear indented below their parent element.
- Attributes appear indented under the element they belong to and are italicized.
- Arrays are identified by the Table keyword in the Type column.
Array handling
In the sample XSD, the book element has maxOccurs="unbounded" which indicates that there could be an array of books. Therefore, the book element is identified as a TABLE type in the 'From Enterprise' section. The Rows In: field can be used to specify the depth of the array. This will represent the maximum number of rows that can be processed and sent to the listener trigger.
Step 3: Mapping the XML tags to logical variables
To automatically generate logical variables with the
correct count (in the case of arrays) and data type, select
the Map Parm button.
The map variables are automatically added to the listener
map Input tab and the XSD element
structure Variable column. It is
recommended that you use the Map Parms
button to ensure the best mappings between the XML Schema
variable types and data types. Also notice that all
elements defining a book have their Count
set to the number specified in the Rows In
parameter.
For this example, assuming a maximum of 3 books, change the
value for the Rows In field to 3, and then
select Map Parms. All the input variables
defining a book will have their Count set
to the number specified in the Rows In
parameter. The array size specified in the Rows
In parameter should be based on the maximum number
of rows that the trigger developer wants to process in the
trigger.
If mapping an XML schema tag of type time, manually adjust the variable associated with the XML element to STRING instead of TIMESTAMP, otherwise the mapping will cause an error when the listener processes the XML.
Alternatively, logical variables can be created manually and then mapped to XML tags in the 'From Enterprise' section.
Parameter descriptions
The following provides additional details for the columns at the bottom of the From Enterprise section of the listener map.
| Column name | Description |
|---|---|
| Parameter | Required. Automatically populated
after selecting a root element (from
the Root Element
parameter). XSD elements can be identified as Structures or Tables where they are complex. When an element is identified as Table by the Transaction Server, it is in fact an array, where you can specify the maximum size of the array (see Value description below). Elements belonging to a structure or table are indented below their parent tag. |
| Type | Required. The Type column shows the data type of the parameter. Unless the XSD element is complex, the type is the XSD type. |
| Parm Type | Required. Refers to incoming or outgoing elements. For this listener map, the Parm Type is always In. |
| Variable | Optional. This is the name of the
map variables associated with the XML
tag. The map variable are selected from the list of variables defined in the Listener Map window Input tab. You can manually add each input variable when you select the Variable column , or you can select Map Parms to automatically generate one or more variables.  |
| Value / Rows In |
Optional. An input field appears
only when the parameter type is set to
TABLE when XML Schema
elements are defined with
maxOccurs="unbounded". The default value is 1 and has the same effect as if it were defined as a structure. The value must be a positive integer. If you select the Map Parms button to generate the map variables, the map variables associated with table elements will automatically have their count updated with the value specified in Rows In. |
When you complete the listener map, click Save.
The name of the listener map is added to the Listener Maps tab.
The next step is to create a trigger that can write the XML tag values to variables.
Creating a trigger that uses a listener event
This section will describe how to create a trigger that uses a listener event. A listener event provides the means to generate events based upon the receipt of a message from an enterprise system.
Follow these steps:
- From the bottom of the appropriate project tab,
click New.
For this example the New Trigger window opens in Canvas Editor mode. - In the Name box, type the name for
the trigger.
- Use the Trigger Event Type
down-arrow, and then select
Listener.
The New Trigger window changes to accommodate the listener event.
- From the Listener Map Definition
drop-down list, select the listener map you just
created.
The next step is to add an action. - From the left pane of the New Trigger window, locate the Set action, and then drag the action on to the canvas area.
- Double-click the Set action to
display its parameters.
- Using the Set action, expand the
variables under Event Variables. Since
books was defined as an array of 3
elements, the event variables are displayed as array of
3 elements.
Notice the Event Variables book_nbrRows which will contains the exact number of elements received in the XML by the Listener. - Complete the Set action as follows
for the book tags:
- Repeat the Set action as needed
for the other event variables: book_genre, book_id,
book_price, book_pub_date, book_title, and
book_review.

Assuming the XML received by the listener contains the following information:
| <?xml version="1.0"
encoding="UTF-8"?> <books xmlns="urn:books" xmlns:xsi="http://www.w3.org/2001/XMLSchema-instance"> <book id="F-132" > <author>author</author> <title>Future</title> <genre>fiction</genre> <price>23.99</price> <pub_date>2009-07-02</pub_date> <review> None </review> </book> <book id="N-335" > <author>writer</author> <title>Romance</title> <genre>novel</genre> <price>11.78</price> <pub_date>2003-05-05</pub_date> <review> None </review> </book> <book id="D-321" > <author>scribe</author> <title>Dream</title> <genre>fantasy</genre> <price>32.99</price> <pub_date>2010-08-02</pub_date> <review> None </review> </book> </books> |
Then the values written to the bookInfo variables are:
The XSD defines the book element with a minOccurs="0". So the XML could be sent without any book elements. In this situation an attempt to use the 'book_price[ ]' event variable in a Set action would result in an -5111 ( Event variable does not exist) error. The value of book_nbrRows will be set to 0. You can use the If action to test the value of the book_nbrRows variable before proceeding with accessing event variables associated with the book element.