The Select operation is used to configure a transport map that will select data from a database and then map the data to an output map variable. When the Transaction action is executed via a trigger, the output map variables can be written to PLC device variables.
The Select with Update operation is configured in much the same way as the Select operation but can also update a set of columns on a record after the row has been fetched from the table. Select with Update allows the rows to be updated in the table based on the values specified in the map variables on the Input tab. The input map variables are also used to specify values in a Where clause in the same way as they would have been used for a Select operation. The output map variables are used to return the fetched row data.
You will not see Select with Update
in the Actions list
for the following database transport
types because the databases do not
support this SQL operation
|
When you specify a Select withUpdate operation,
you can also specify how the table is locked when the
transaction is executed by the trigger. There is
pessimistic and optimistic locking as follows:
Pessimistic locking
Pessimistic locking secures the database table that is the source of the data which prevents other database users from modifying data on that table while the Select with Update operation is being executed. When the transaction completes its execution, the lock on the table is released.
Use pessimistic locking to ensure that no rows are being added to the table while the Select with Update operation is executing. Pessimistic locking is not recommended when the target table has many users who want to access and update the data. In addition, pessimistic locking will prevent a phantom read phenomenon in the database concurrent access terms.
Optimistic locking
Optimistic locking is less restrictive and allows other users to update data on the table (except for the rows that are being selected). Using optimistic locking allows rows to be added to the selected result set that match the Where clause criteria specified in the Select with Update operation while the result set (row set) is being processed. This will not prevent a phantom read phenomenon in database concurrent access terms.
The following shows an example transport map with a Select with Update operation that will select the data from the WIP_SCHEDULE table.
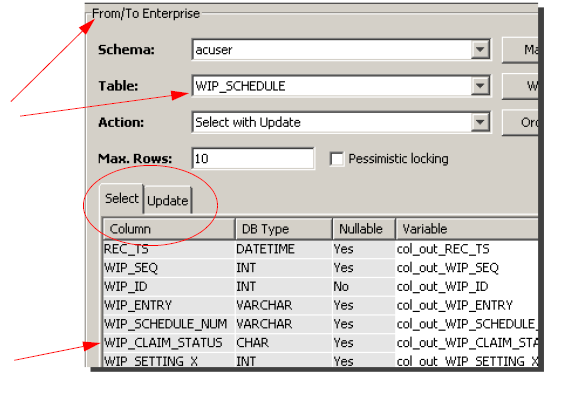
In the example, the rows in the WIP_SCHEDULE table represent scheduled entries that will be processed by a trigger. Rows that are available to be selected have a WIP_CLAIM_STATUS of U. After the rows have been selected, the WIP_CLAIM_STATUS column will be set to C.
The WIP_CLAIM_STATUS column is used to build the Where clause that will select rows from the table. After the rows have been selected, the WIP_CLAIM_STATUS column will be updated with a user defined status value (in this case U) indicating that rows have been fetched. This allows the example scheduling application to determine which rows have been fetched by a trigger. Max Rows is set to select 10 rows of data (this prevents more than 10 rows of data from being fetched). Pessimistic locking is turned off.
The From/To Enterprise section has a Select tab and Update tab. When the table is specified, both the Select and Update tabs become populated with the table information.
The first step is to create the map variables.
-
To automatically create the map variables, click the MapTable button.
Using Map Table with Select with Update automatically populates both the Output and Input tabs with map variables and also associates those map variables to the appropriate columns on the Select and Update tabs.
When you add a value for Max Rows, that value is also automatically added to the Count column on the Output tab.
For this example, the map variables for the Input tab will be created separately. Therefore, the variables created from Map Table will be removed. - From the Input tab, display its
pop-up menu, and then click Clear All.
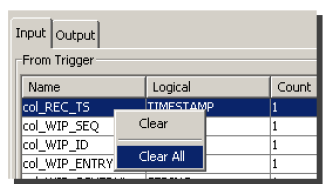
The Input tab becomes empty.
The next step is to create map variables for the Input tab. - From the Input tab, click
Add.
The New Item window appears. - Type the name for the input map variable (for this
example col_input_WIP_STATUS), select
string as the data type, and set the length of the
string to 1. Accept the default value of 1 in the
Count box.
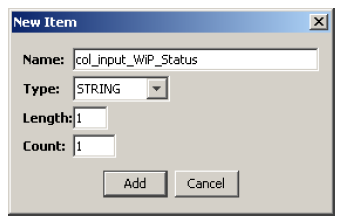
- Click Add. The input map variable
is added to the Input tab.
- Repeat the step for
col_input_set_WIP_STATUS.
The completed Input tab will appear similar to the following: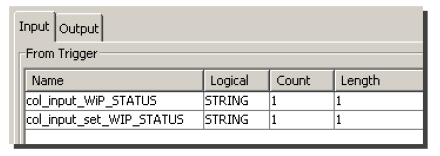
The col_input_WIP_STATUS will be used in the Where clause of the Select that is executed on the WIP_SCHEDULE table.
The col_input_set_WIP_STATUS will be used to set the WIP_CLAIM_STATUS column on the rows as they are being selected from the database.
The next step is to associate the col_input_set_WIP_STATUS map variable with the WIP_CLAIM_STATUS column on the Update tab. - From the Update tab, select the
WIP_CLAIM_STATUS column, and then
click the Variable column.
A list of variables appears.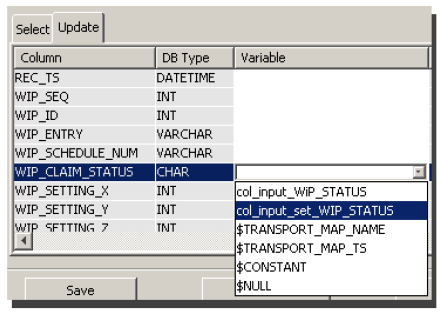
- Select the
col_input_set_WIP_STATUS map
variable.
The next step is to add a Where clause. - Click the Where button.
The Where window appears.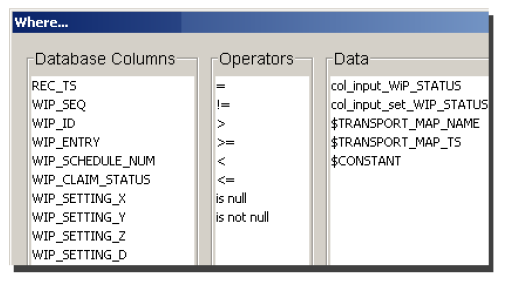
- Select one or more database columns that you want
updated (for this example
WIP_CLAIM_STATUS), the operator (for
this example =), and the variable whose value you want
to use in the Where (for this example
col_input_WIP_STATUS).
The statement will be similar to the following: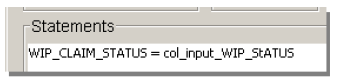
- When the Where clause is complete, click
OK.
You are returned to the main Transport Map window.
The final step is to create a trigger and assign the transport map as the action. You will associate the map variables in the Transaction action definition with the appropriate device variable or other variable.
When the trigger executes, the following will occur.
- Up to 10 rows will be selected from the table using the value specified in col_input_WIP_STATUS to build a Where clause.
- After the rows have been fetched, the WIP_CLAIM_STATUS column will be updated with the value specified in col_input_set_WIP_STATUS input variable.
The end result is that the rows that were selected will have their WIP_CLAIM_STATUS column updated with the value specified in the col_input_set_WIP_STATUS map variable.