Backing up and Restoring a node's configuration
Backing up a node's settings and definitions
The Back Up option will save all of the node's system configuration settings and application definitions into a file. There may be a question to include the node's network settings, depending on the product installed on the node.
The Back Up option is in the Workbench's pop-up menu for a node. Using the Workbench, right click the node's icon in the Node List to display the node's pop-up menu.
This node backup file can then be saved to a file on the computer running the Workbench.
Node Back Ups
Doing a node Back Up periodically during your application development and debug cycle is an important habit to have. The back up files can be named something that is meaningful to the stage of your development cycle, or the default file name of the node name appended with the IP address and a date and time serializer will help with the back up file management. The node Back Up process uses all of the node's configuration settings and application definitions. It is similar to the item Export function.
Local Database table contents
A node Back Up does not include the table contents of the Local Database tables.
For more information, see Exporting and Importing Local Database tables and Local DB Export.
Referenced file size limit
Files in the Staging Browser area that are referenced in your application will be included in the Back Up. There is a configurable file size limit that controls whether a referenced file is included in the Back Up.
The default file size limit is 8192 bytes. This can be changed by adding a property as described in Properties file management.
An example is: filesystem.staging.size=15000
Restoring a node's backed up settings and definitions
The Restore option will read a previously saved node back up file and display the settings and definitions in a list that allows you to select All or specific items to restore to the node.
The Restore option is in the
Workbench's pop-up menu for a node. Using the Workbench,
right click the node's icon in the Node List to display the
node's pop-up menu.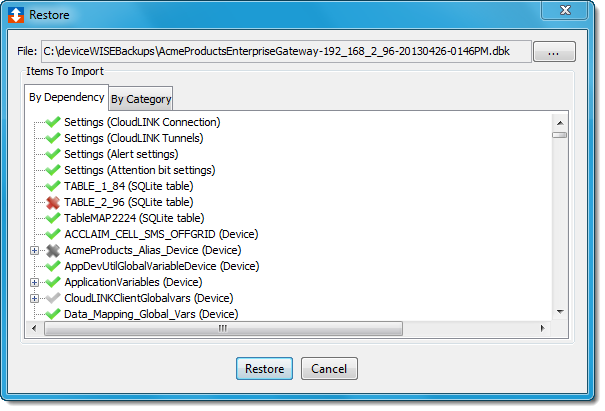
The two tabs available on the Node Restore window present the saved information in difference ways:
- The By Dependency tab displays the
items in a dependency list that can be expanded and
collapsed through the dependencies of an item. The
individual items and its dependencies can be selected,
represented by a green check mark, or not selected,
represented by a red X. A grey check mark or X
indicates that an item's dependencies are partially met
or the item is not selected, but one of its
dependencies is selected.
Examples of dependencies can best be seen by doing a node back up and then a node restore and selecting different items in the tab.
For example:- A trigger is dependent on the project that it resides in.
- A trigger is dependent on a device if the trigger references a variable in that device.
- A trigger is dependent on a transport map that it references.
- A transport map is dependent on the transport that it references.
- And so forth.
- The By Category tab displays the items by the type (or category) of the items. If the By Category tab is used to select items, each item's dependencies are not automatically selected as they are with the By Dependency tab selections.
You can right click on any item to display a pop-up menu that has the options to Select All or Deselect All. After the restore completes, a window will display any errors encountered during the restore process.