The Workbench provides the view into a node's installation, configuration and resource definition. The Workbench also provides access and control over those resources.
A device is a resource that can represents a physical device, such as a programmable logic controller (PLC), an RF tag reader or a sensor. A device can also be defined in one node to represent a device that is defined and supported in another node. This allows your application solution to have access to devices and their data independent of their location or connectivity details.
An OPC-DA Client device is a resource that is a client to an OPC-DA server.
To define a device that represents an OPC-DA Client device, follow these steps:
- From the Workbench left pane, expand the node where you want to define the OPC_DA Client device.
- Select the Devices icon to display
the Devices panel, right-click the Devices icon to
display its pop-up menu, and then select
New.
You also can select the New button at the bottom of the Devices panel.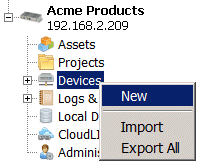
The Device window appears. - Name the device. The device name can be up to 64 characters and include letters, numbers, and the underscore character. Spaces are allowed.
- Use the Type down-arrow to locate
the OPC category, and then select the
DA Client device type. The available
device types are determined by the driver packages that
are installed on the node.
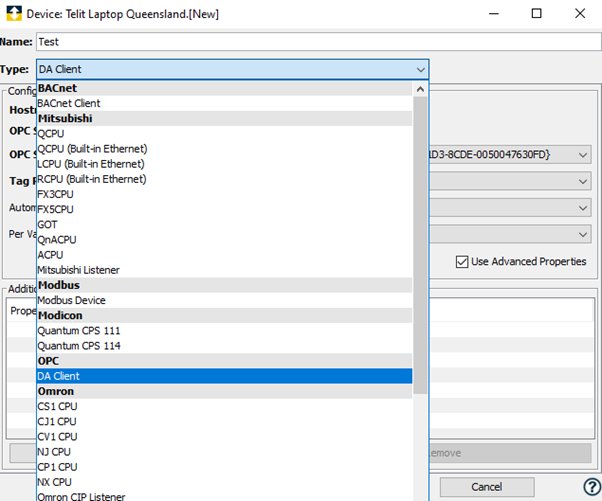
- The Device window changes to accommodate the selected device type.

- To define a device that represents an OPC-DA
Client, set this new device's parameters as
follows:
Parameter
Description
OPC Server Entry Select "OPCEnum" to activate the feature if necessary. This selection will cause deviceWISE to display a list of the OPC servers installed on the PC through OpcEnum. If the automatic enumeration is set to manual, the URL must be entered into the "OPC server URL” field. OPCEnum is usually installed with an OPC Server and can also be obtained from the OPC Foundation. OPC Server URL
The names of the OPC DA servers installed on the node.
Tag Read - Write Style
There are two options: Session based (OPC 3.0 Spec) or Subscription based (OPC 2.05 Spec).
The default is Session based and must be used when communicating with OPC Servers that are only 3.0 compliant.
The Subscription based option must be selected to communicate with servers that are not in compliance with the 3.0 specification. The Subscription based option will also provide the best performance if the OPC Server you are communicating with supports tag subscriptions. Values for all tags will be read from memory, which is refreshed when the server publishes data change events.Automatic Enumeration Select False to enable the selection of Node Names. Select True to enable this feature if required. Per variable security
Select False to disable the allocation of additional memory to track user to variable access for all variables in this device.
Select True to enable this feature if required. For more information, see Setting up Read Write per device variable.Node Names A list of branch paths, in the form of OPC tag names, separated by commas, to be included in the enumeration. All sub-tags under each listed path will also be enumerated.. - Select Validate to have the parameters validated and to connect to the OPC-DA server application. If there are problems connecting to the OPC-DA server, an error code will be displayed.
- Click Save to save the device definition. The device will appear in the Devices window list of devices.
- You can now control the device (Start, Stop), access the device's variables by using the Variables window, and build solutions that use the device's resources.
Additional properties
Additional properties allow a device to provide capabilities beyond what the typical device definition allows. The OPC-DA Client device has additional properties that you can make use of to satisfy requirements that are beyond what the device definition typically provides. The properties are default_array_size and default_string_size. This optional property is not global in nature and can be defined on a device by device basis.
To define an additional property for an OPC-DA Client device, follow these steps:
- Under Additional Properties of the
Device Definition, click Add
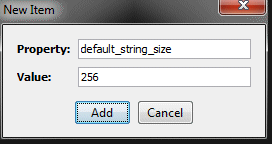
New Item window appears - Enter the name of the property, default_array_size, in the Property parameter. Enter the value of the property in the Value parameter.
- Click Add to add the property to the device definition.
- Enter the name of the property, default_string_size, in the Property parameter. Enter the value of the property in the Value parameter.
- Click Add
The following image shows a device with both the default_array_size and default_string_size Additional Properties defined.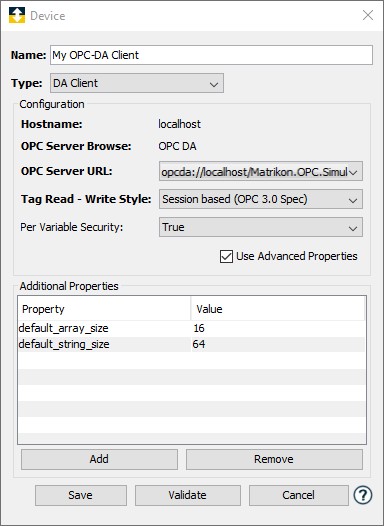
The reasons behind the use of this Additional Property is detailed below.
OPC strings versus runtime strings
The size of a string in OPC and the runtime are handled in a similar manner respective to how the two platforms handle the size of arrays. Strings must have a defined maximum size in the runtime, while the length of a string can dynamically change in OPC. The maximum length for a runtime string puts a limit on how many characters the string can contain, though it can contain fewer characters than the maximum. The OPC standard does not put a constraint on the size of a string, it may grow as large or small as is needed. To accommodate this, the OPC-DA Client driver will define all OPC string tags to have a maximum size of 64 characters. Strings exceeding this size will be truncated to fit within this 64 character limit.
The default_string_size additional parameter allows the user to define a maximum string length that will be applied to all OPC strings. The value of this property must be greater than 0 but less than 65535. If this property is defined with a valid value, all device variables that represent OPC-DA string data typed tags will allow a maximum number of characters up to this value.
Advanced Logging
The OPCDA driver has advanced logging options for monitoring communication with the OPC Server, which can be enabled through the persistence settings. To turn it on, go to persistence and set the value to "1" for the group "opcda.client" and name "enable_tracing". It is important to note that this setting should not be left active and should be reset to "0" when not in use.