This page describes downloading and installing the deviceWISE Enterprise Gateway for Windows.
- The deviceWISE Enterprise Gateway for Windows
requires:
- Approximately 232 megabytes (MB) of disk space.
- At the very minimum, 75 megabytes (MB) of available
memory.
Memory utilization greatly varies based on the application needs, and the number of concurrently executing triggers - The versions of Windows supported include:
- Windows 7 (32-bit and 64-bit)
- Windows 10 (32-bit and 64-bit)
- Windows Server 2012 R2 (32-bit and 64-bit)
- Windows Server 2016 (32-bit and 64-bit)
- Windows Server 2019 (64-bit)
- Windows Server 2022 (64-bit)
- You need a Management Portal user ID and password
to download the
Enterprise Gateway install files from the Management Portal. For more information on creating your Management Portal account, see Creating the deviceWISE Cloud account.
If you received the install files from your Telit Technology representative, skip the download steps and proceed with Running the install program. - You have the permissions required to install software on the Windows system. This will require a Windows user account with administrator access.
You must have administrative rights to install files, services, and add firewall exceptions on the system where you are installing the Enterprise Gateway software.
Starting with version 19.1.6, the deviceWISE product no longer installs to the filesystem path C:\deviceWISE\Runtime. Then new installation path defaults to:
- 32-bit - C:\Program Files (x86)\deviceWISE\Gateway
- 64-bit - C:\Program Files\deviceWISE\Gateway
- Log on to the Management Portal
- Navigate to Developers >> Resources
- Click on the appropriate build folder(if you are not sure, pick the latest available build).
- Navigate to
- 32-bit - OS_Windows>>Windows-32bit>>Enterprise_Gateway
- 64-bit - OS_Windows>>Windows-64bit>>Enterprise_Gateway
- Click on DWGateway_Install.Windows_NT.XXX.exe (where XXX is the version of the Enterprise Gateway software you want to download). It will download the file to a temporary location on the computer.
- Double-click the downloaded file to execute the install program and perform a Typical install from the installer dialogue.
- If a security warning appears, click Run to proceed with the installation.
- Read the Gateway Software license and select the check box to agree to the license terms and conditions
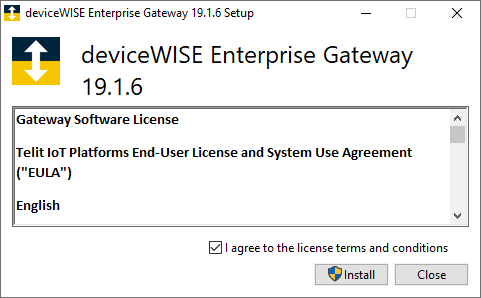
- Click Install and follow the prompts to complete installation
Managing deviceWISE services
When Windows starts, the deviceWISE services are automatically started. The deviceWISE services are managed through the Windows Services Control Panel. For information regarding Windows service management, please refer the official Microsoft Windows documentation for your current OS version.
Starting with version 19.1.6, the deviceWISE product no longer installs to the filesystem path C:\deviceWISE\Runtime. Then new installation path defaults to:
- 32-bit - C:\Program Files (x86)\deviceWISE\Gateway
- 64-bit - C:\Program Files\deviceWISE\Gateway
You must perform a backup of the node through Workbench, and then uninstall any previous versions of deviceWISE before proceeding with the installation.
- Perform a Back Up of the deviceWISE node. For more information on node backup, see Backing up and Restoring a node's configuration
- Log on to the Management Portal
- Navigate to Developers >> Resources
- Click on the appropriate build folder(if you are not sure, pick the latest available build).
- Navigate to
- 32-bit - OS_Windows>>Windows-32bit>>Enterprise_Gateway
- 64-bit - OS_Windows>>Windows-64bit>>Enterprise_Gateway
- Click on DWGateway_Install.Windows_NT.XXX.exe (where XXX is the version of the Enterprise Gateway software you want to download). It will download the file to a temporary location on the computer.
- Double-click the downloaded file to execute the install program and perform a Typical install from the installer dialogue.
- If a security warning appears, click Run to proceed with the installation.
- Read the Gateway Software license and select the check box to agree to the license terms and conditions
- Click Install and follow the prompts to complete installation
- Perform a Restore of the deviceWISE node using the backup generated previously. For more information on node restore, see Backing up and Restoring a node's configuration
Managing deviceWISE services
When Windows starts, the deviceWISE services are automatically started. The deviceWISE services are managed through the Windows Services Control Panel. For information regarding Windows service management, please refer the official Microsoft Windows documentation for your current OS version.
Starting with version 19.1.6, the deviceWISE product no longer installs to the filesystem path C:\deviceWISE\Runtime. Then new installation path defaults to:
- 32-bit - C:\Program Files (x86)\deviceWISE\Gateway
- 64-bit - C:\Program Files\deviceWISE\Gateway
You must perform a backup of the node through Workbench, and then uninstall any previous versions of deviceWISE before proceeding with the installation.
- Perform a Back Up of the deviceWISE node. For more information on node backup, see Backing up and Restoring a node's configuration
- Manually back up any files used in the Staging Browser folders and any properties files added after of the original deviceWISE installation to a safe location on the node outside of the default installation path,. (Example: Files and directories in C:\deviceWISE\Runtime\staging or C:\deviceWISE\Runtime\dwcore\dwuser.properties).
- Uninstall the previous version of deviceWISE before version 19.1.6
- Open Control Panel in your Windows machine
- Double-click Add or Remove Programs, Uninstall a program, or Programs and Features depending on your version of Windows.
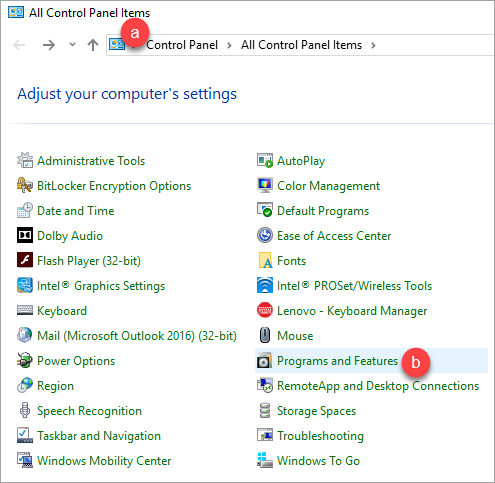
- Select deviceWISE Enterprise Gateway
- Click the Remove, or Uninstall button.
- Log on to the Management Portal
- Navigate to Developers >> Resources
- Click on the appropriate build folder(if you are not sure, pick the latest available build).
- Navigate to
- 32-bit - OS_Windows>>Windows-32bit>>Enterprise_Gateway
- 64-bit - OS_Windows>>Windows-64bit>>Enterprise_Gateway
- Click on DWGateway_Install.Windows_NT.XXX.exe (where XXX is the version of the Enterprise Gateway software you want to download). It will download the file to a temporary location on the computer.
- Double-click the downloaded file to execute the install program and perform a Typical install from the installer dialogue.
- If a security warning appears, click Run to proceed with the installation.
- Read the Gateway Software license and select the check box to agree to the license terms and conditions
- Click Install and follow the prompts to complete installation
- After installation completes, copy the previously backed-up files to the new installation path.
- Files and directories required in the Staging Browser should be copied to: C:\Program Files (x86)\deviceWISE\Gateway\staging
- Properties files should be copied to: C:\Program Files (x86)\deviceWISE\Gateway\dwcore
- Perform a Restore of the deviceWISE node using the backup generated previously. For more information on node restore, see Backing up and Restoring a node's configuration
Managing deviceWISE services
When Windows starts, the deviceWISE services are automatically started. The deviceWISE services are managed through the Windows Services Control Panel. For information regarding Windows service management, please refer the official Microsoft Windows documentation for your current OS version.
- Log on to the Management Portal
- Navigate to Developers >> Resources
- Click on the appropriate build folder(if you are not sure, pick the latest available build).
- Navigate to
- 32-bit - OS_Windows>>Windows-32bit>>Enterprise_Gateway
- 64-bit - OS_Windows>>Windows-64bit>>Enterprise_Gateway
- Click on DWGateway_Install.Windows_NT.XXX.exe (where XXX is the version of the Enterprise Gateway software you want to download). It will download the file to a temporary location on the computer.
- Double-click the downloaded file to execute the install program and perform a Typical install from the installer dialogue.
- If a security warning such as The publisher
could not verified. Are you sure you want to run this
software? appears, select Run to
proceed with the installation.
The Welcome to deviceWISE Gateway Setup Wizard screen appears.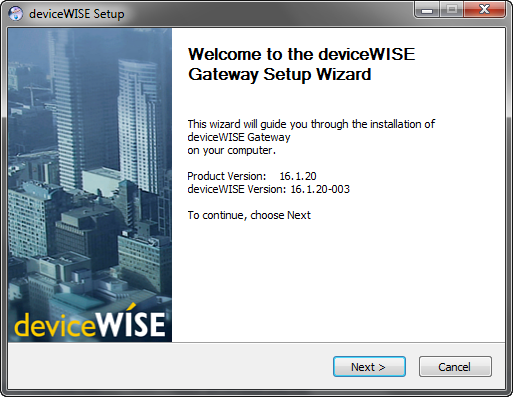
- Click Next.
A license agreement screen appears. - Accept the terms of the license agreement, and then
select Next.
The Choose Install Location screen appears.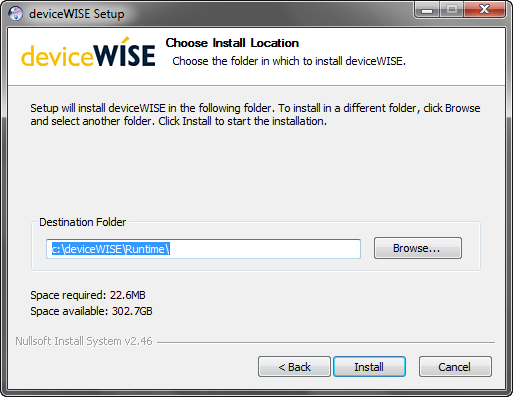
- When the installation is complete, select
Next.
Completing the deviceWISE Setup Wizard screen appears - Click Finish.
Starting, stopping deviceWISE services
The Enterprise Gateway for Windows software runs as Windows services and will normally be started when Windows is started. If the main Enterprise Gateway components need to be started or stopped for some reason, there are actions available from the Windows Start button.
From the Windows Start button, click deviceWISE and the action
to take, as shown in this example: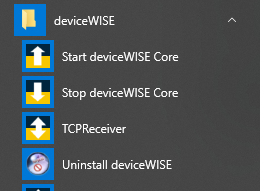
To uninstall the Enterprise Gateway Software on Windows follows the procedure below:
- Open Control Panel in your Windows machine
- Double-click Add or Remove Programs, Uninstall a program, or Programs and Features depending on your version of Windows.
- Select deviceWISE Enterprise Gateway
- Click the Remove, or Uninstall button.
If you are following the steps in the Getting started with IoT Gateways , then continue with the tasks described in Installing the Workbench to perform the initial Enterprise Gateway LAN settings configuration and to connect the Enterprise Gateway to the deviceWISE Cloud.
If you are not following the steps in the Getting Started with Gateways guide and need to install the Workbench, then continue with the tasks described in Installing the Workbench software.
If the Workbench is already installed, then for information on using the Workbench and the deviceWISE features, see The Workbench.