Adding a trigger
To create a new trigger, do the following:
- From the Developer main
screen in the GENERAL group,
click Triggers.
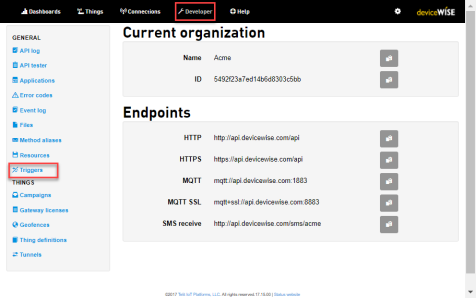
The Triggers screen appears. - Click on New Trigger button
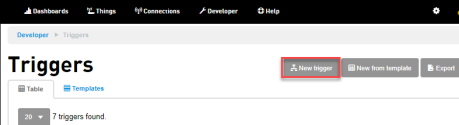
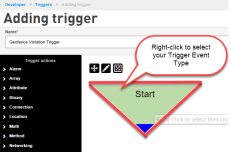
Adding Trigger screen appears. - Enter the Name,
Description and Tags (Both Optional)

- Right-click on the Start node to
select a Trigger Event Type
Add trigger event dialog appears. - Click the Event type
drop-down.
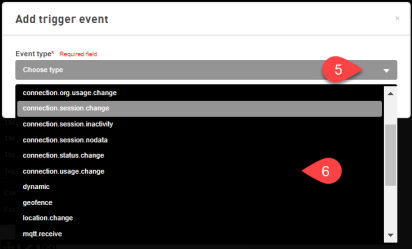
- Select the Event type, your trigger will
be listening to.
Event form appears. - Enter the details in the Cloud trigger event form.
For more information on entering the details in the
Cloud trigger events, see Cloud Trigger Events.
When the trigger event is chosen, specific event fields will be shown to customize the trigger firing rules, for example, tags, endpoint and others.
- Click Add.
- Select an action you want to perform when the
trigger event happens. To select a trigger action:
- Click on the Trigger actions category name to expand and view the available Trigger actions.
- Click and hold while you drag the selected action to the canvas.
- Click on + or
- to expand or collapse
all trigger action categories.
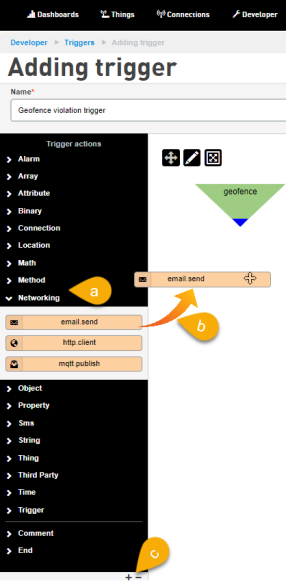
Add trigger action form appears.The Node info on the right side of the interface displays the configuration of the currently selected Trigger event or Trigger action.
- Enter the details in the Cloud trigger actions
form. You can add one or more actions to a trigger.
Each action is able to access the prior actions output
in addition to variables made available by the trigger
event. In the case of some actions (email.send,
thing.log, and so on.) there are no output
variables. For more information on entering the details
in the Cloud trigger action form, see Cloud Trigger Actions.
- Click Add.
-
Click and hold while you drag the arrows from the colored edge to connect the nodes.

 Pan
Mode - Allows
the canvas to be scrolled
both horizontally and
vertically. While
in Pan mode,
holding the CTRL (control)
key and clicking node(s)
will allow you to
select/de-select multiple
nodes.
Pan
Mode - Allows
the canvas to be scrolled
both horizontally and
vertically. While
in Pan mode,
holding the CTRL (control)
key and clicking node(s)
will allow you to
select/de-select multiple
nodes. Select Mode
- Allows selecting one or
more nodes for
repositioning on the
canvas. The
Select mode works
in two ways: when you drag
from left to right, any
node that intersects your
lasso will be selected.
When you drag from right to
left, only nodes that are
enclosed by your lasso will
be selected.
Select Mode
- Allows selecting one or
more nodes for
repositioning on the
canvas. The
Select mode works
in two ways: when you drag
from left to right, any
node that intersects your
lasso will be selected.
When you drag from right to
left, only nodes that are
enclosed by your lasso will
be selected. Fit trigger
to screen - Fit the trigger
to the screen
Fit trigger
to screen - Fit the trigger
to the screen -
Connect a Success node at the end of the route.
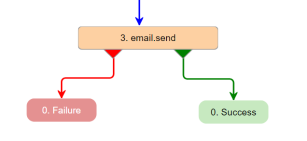
You should have at least one success route to save it.
-
Click on the Reporting mode drop-down to select the mode for the reports to get generated
Report Modes
Off - No trigger events will be reported
On - All trigger events will be reported. When On is selected the trigger events are reported for the next 30 days and later it automatically switches to the default On failure mode.
On failure(default) - Only events that failed will be reported.
For more information on viewing trigger reports, see Viewing Trigger Report.
When attempting to connect a route, drag it over the destination node until it turns grey. When the destination node turns grey it is aware of the route being connected to it. While the destination node is grey, release the mouse button to bind the route to it.
-
Click Add.
Trigger Scheduling
By default, your triggers are active all days and hours. Use Active Window to specify certain hours or days of the week when you want your triggers to be active. For more information on scheduling a trigger, see Scheduling a Trigger.
A Trigger Sample
Building a trigger for a Generator with a thing key generator. This generator has a fuel tank with a property key of "fuel" that contains the amount of fuel in the tank (measured in gallons). The generator also has an attribute with a key of "capacity" that specifies the size of the fuel tank. Additionally, there is an alarm with a key of "status" that describes the fuel level, with 0 (zero) representing an acceptable amount of fuel, and 1 (one) meaning the fuel is low.
The trigger is build to execute when the "fuel" property changes the thing "generator". The "capacity" attribute is read to determine if the percentage remaining in the tank is less than or greater than 10%. If it is greater than 10%, the "status" alarm is set to 0 (zero) and end the trigger successfully. If the tank is 10% or less, the status is set to 1 and end the trigger successfully.
To build the Generator sample trigger, do the following:
- In the Trigger screen, click
New Trigger button.
- Enter the Name of the
trigger. For example, Generator fuel
level

- Right-click on the Start node to display the trigger event window.
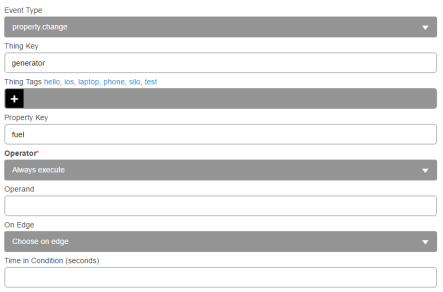
- Set the Event type to property.change.
- Set Thing key to be
generator and Property
key to be fuel.
- Click the Add button
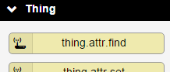
- Expand
the Thing actions
- Click and hold while you
drag thing.attr.find onto
the canvas
- Set the Thing key to be "$(event.thing.key)" (alternatively, use "generator" as the preceding Event variable contains this string), and Attribute key to be "capacity".
- Click the Add button.
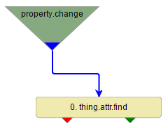
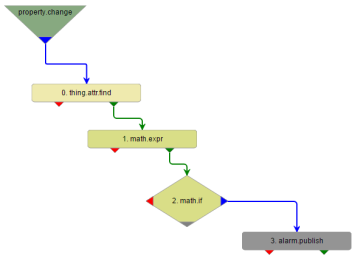
- Create the Route from
the property.change event triangle
to
the 0.thing.attr.find action.
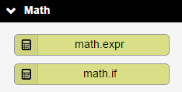
- Expand
the Math actions
- Click and hold while you
drag math.expr onto the
canvas.
- Set the Expression to
be "$(event.prop.value) / $(action.0.value)
* 100".
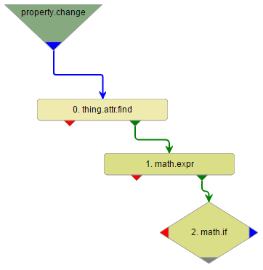
This will divide the current fuel value by the capacity of the tank and multiply that result by 100 thus giving us a percentage. - Create the success Route from 0.thing.attr.find to 1.math.expr.
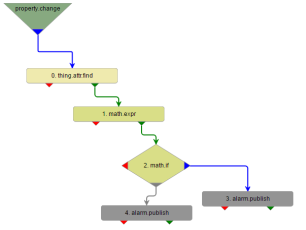
- Click and hold while you drag math.expr onto the canvas.
- Set the Expression to
be "$(action.1.value)
<= 10".
This will compare the percentage of fuel remaining to 10%. - Create the
success Route from 1.math.expr to 2.math.if.
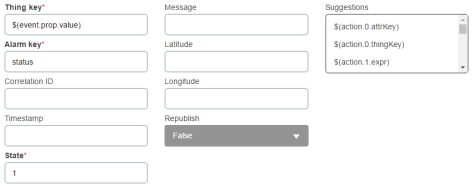
- Open the Alarm heading and drag alarm.publish onto the canvas.
- Set Thing key to be
$(event.prop.value) (alternatively,
use generator as the
preceding Event
variable contains this
string), Alarm key to be
"status", and State to be
"1".
- Click the Add button.
- Create the true Route from 2.math.if to 3.alarm.publish.
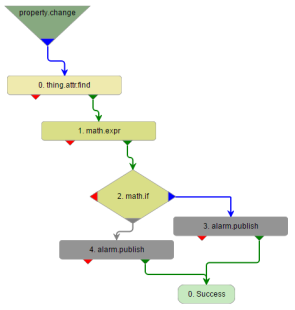
This is the Route the logic will follow when the fuel value is 10% or less. - Click and hold while you drag another alarm.publish onto the canvas.
- Set Thing key to be "$(event.prop.value)" (alternatively, use "generator" as the preceding Event variable contains this string), Alarm key to be "status", and State to be "0".
- Click the Add button.
- Create the
false Route from 2.math.if to 4.alarm.publish.
This is the Route the logic will follow when the fuel value is greater than 10%. - Expand
the End action
- Click and hold while you drag Success onto the canvas.
- Create the
success Route from 3.alarm.publish and 4.alarm.publish to 0.Success.
- Click the Add button at the bottom of the screen.
- Click the Start button
to activate the trigger.
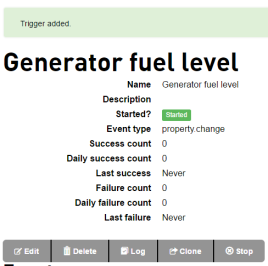
You would now have a working trigger for the generator.