Configuring the OPC UA Server
To Configure the OPC UA Server, do the following:
- Make sure the OPC UA Server is installed. For more information on Installing OPC UA Server, see OPC UA Server configuration.
Once OPC UA server is installed, the OPC UA Server tab will appear in the Administration panel.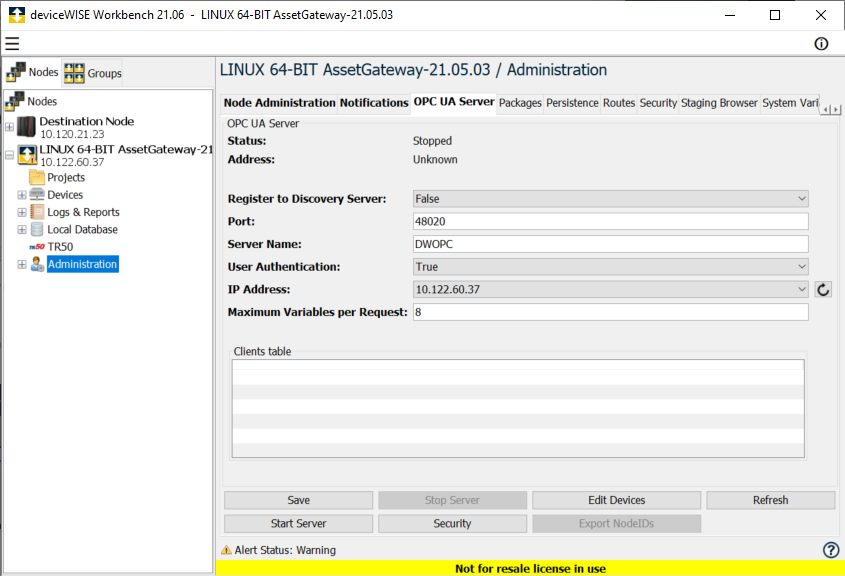
- Enter or select the details as described in the table below:
Parameter Description Status (Read Only) The Server status will be either Started, Stopping, or Stopped. Address (Read Only) The full address of the OPC UA Server. It shows Unknown, if the server has not started. Register to Discovery Server If it is set to True, it allows the deviceWISE OPC UA Server to be registered with the defined OPC UA Discovery Server service. The field Discovery Server Address appears. Discovery Server Address Address of Discovery Server to Register. For example: opc.tcp://172.27.14.178 Discovery Server Register Interval(ms) Time interval (in milliseconds) to register to the Discovery Server (1000 to 1800000). Port The port number of the OPC UA Server exposed to the clients to connect. (1 to 65535) Server Name Name of OPC UA Server exposed to clients. If you change this name, the server certificates need to be deleted in the Staging Directory. 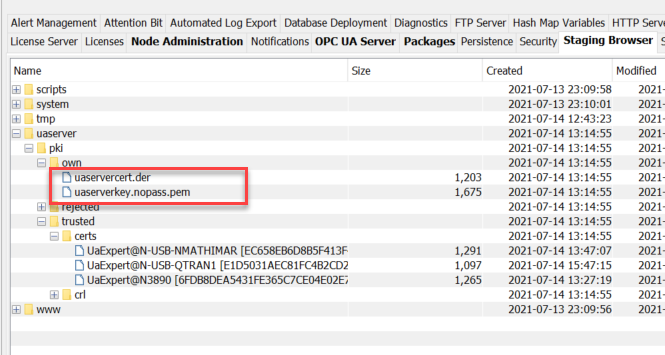
The Server certificates will be recreated when you restart the server.User Authentication Enables the authentication to connect only by deviceWISE users from OPC UA Clients, if value is set to True. The user name and password will be from the Users tab. IP Address IP address or host name of OPC UA Server exposed to clients. Maximum Variables per Request The maximum possible number of variables send in each read/write request to the device (1 to 10) . Use 1 for devices with communication issues and higher values to maximize performance. - Click Save button to save the details.
- Click Edit Device, to select the deviseWISE devices to expose variables to OPC Clients. Select a device in the Available list and press the
 button to move it to the Selected list. To deselect a device, select a device in the Selected list and press
  .
.
Parameter Description Visible Devices: Available The list of all the devices defined on the node. The icon preceding the device name indicates the current state of the device. The green check mark icon indicates the device is currently in a Started state. The device must be in a Started state for its variables to be available to the OPC UA Clients. Visible Devices: Selected The list of devices that will be exposed to OPC UA Clients. View Filter Enter text in the Name field to filter the Available devices. Select the check boxes Started and Stopped/Disabled to further filter your results. - Click Security.
Edit Security window appears. - In the Edit Security window, make sure you pick atleast one security algorithm. The messages are encoded using the selected encryption algorithm. The OPC UA Client should use the same algorithm to decode the encrypted messages.
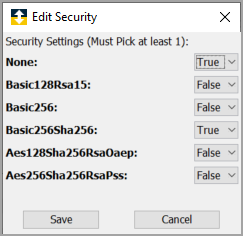
The following are the supported security options.- None - selecting this option, will send the raw message without any encryption.
- Basic128Rsa15
- Basic256
- Basic256Sha256
- Aes128Sha256RsaOaep
- Aes256Sha256RsaPss
- Click Start Server to start the OPC UA Server.
The Export NodeIDs will be active when the server starts. When you start for the first time, the uaserver folder gets created in the Staging Browser. The uaserver folder contains the certificate and the key files.If the certificates were deleted due the Server name change, the certificates will get recreated.
- Click Export NodeIDs. This button will create a .CSV file listing every tag and it’s associated Node ID. The following parameters are shown on the Export NodeIDs sub panel tab:
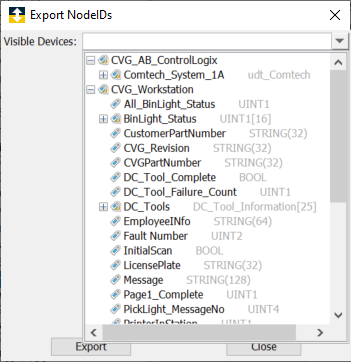
Parameter Description Visible Devices: Available List of all devices in the started state on the deviceWISE node and their variable hierarchy. Choose the device name or the variable hierarchy path to export NodeIDs. Only devices in started state are listed.
- You will be able to select a single device at the root level and NodeIDs of all tags of the device will be exported.
- You will be able to select a structure and NodeIDs of all children of the structure will be exported.
- You will not be able to select all the devices at once, it is possible to select only one device at a time. You will be able to select only one variable at a time.
- The path generated after selecting a device or a tag from device can be edited before saving.
- If you select element of an array, NodeID of that variable will be exported as the NodeID is the same for the whole array.
- If you select Nested BOOL of a variable, NodeID of that variable will be exported since Nested BOOL is not supported in OPC UA Server.
Export Click Export to save the NodeIDs into the file for the selected device or variable and child members, if the variable is a structure. The exported file is created in the staging folder - /uaserver/nodeid/. Done Click Done to close without exporting. NodeId format for Root.Objects.Telit
- For a Device, NodeId is created as
<device_name>in Root.Objects.Telit folder. - For a Variable started as first member in a device, NodeId is created as
<device_name>.<var_name> - For a Structure started as first member in device, NodeId is created as
<device_name>.<struct_name> - For Variable inside a structure, NodeId is created as
<device_name>.<struct_name>.<var_name> - For each variable/structure, NodeId format follows the path of the variable in variable hierarchy with a prefix of device name.
For example:<device_name>.<struct_1_name>
<device_name>.<struct_1_name>.<struct_2_name>
<device_name>.<struct_1.struct2_name>.<var_name>