Touring the Workbench
The Workbench default window consists of four main areas that includes the Title bar, Menu bar, Left hand pane, and Right hand pane. Click Nodes, to display a Nodes list in the left hand pane and a Nodes table in the right hand pane as seen below.
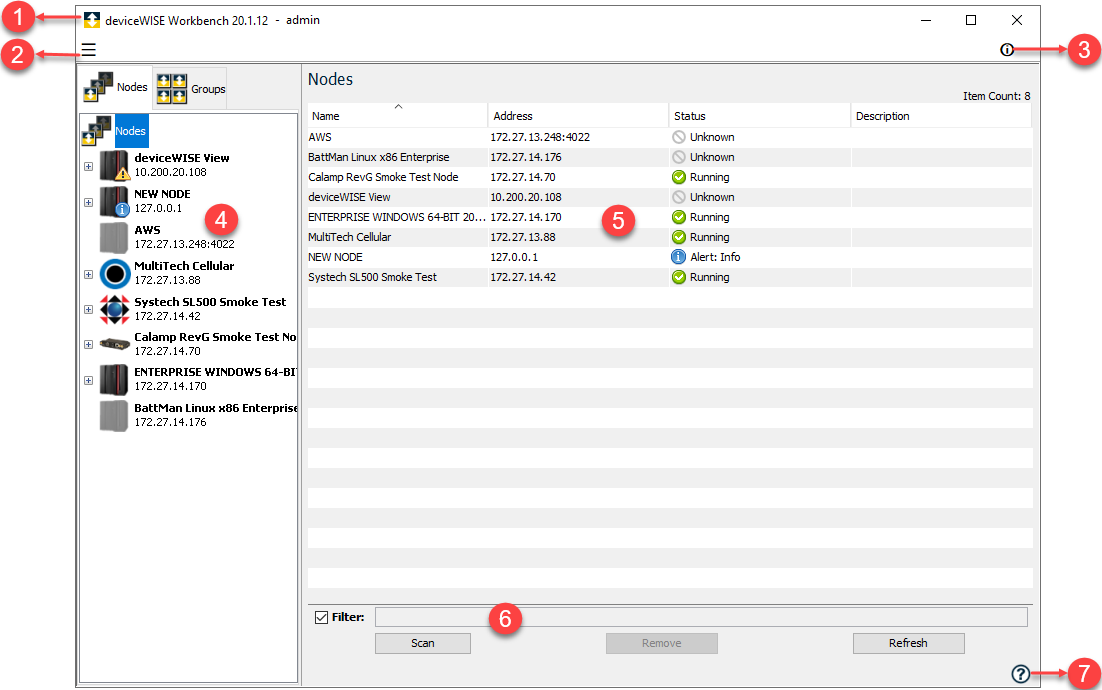
The parts of the Workbench window for this view are described in the following sections.
| Component | Description |
|---|---|
 Title bar Title bar |
The Title bar displays the version of the Workbench, name of the node, and your user name. |
 User/Setting Menu User/Setting Menu |
The User/Settings menu is a part of the Menu bar and has the following entries:
|
 Help/Info Menu Help/Info Menu |
The Help/Info menu is a part of the Menu bar and has the following entries:
|
 Left hand
pane Left hand
pane |
The Left hand pane displays a tabbed pane with Nodes and Groups, each of which is explained in Managing the Workbench Nodes list and Managing the Workbench Groups list respectively. The pane displays the Nodes list of all of the
nodes that have been saved by the Workbench or within a certain group. If a
node's icon is greyed out, click on it to reconnect. Expand a node by clicking its Each node in the Nodes list shows a node icon that is specific to the product installed on the node, the node name, the IP address or TR50 Thing key used to connect to the node, and if applicable the highest level active alert state or the attention bit for the node. The alert state or attention bit is displayed as a small icon overlaid on top of the node icon. |
 Right hand
pane Right hand
pane |
The Right hand pane displays a Nodes table with additional information for each node. The columns are sortable, by selecting the column heading. The columns is reordered by dragging and dropping to a new position in the table. |
 Filter Filter |
The Filter option allows you to
input filter parameters to reduce the number of items displayed in a table.
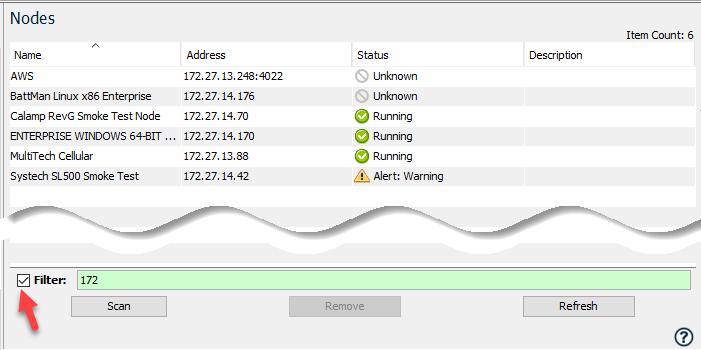 While the filter box selected, entering a value in the filter displays the filtered nodes. Hitting enter within the field will force the filter to be applied if the box is not checked. The field will highlight green to indicate it is active. It is possible to enter a single value or a comma separated list of values. Each will match case insensitively on any substring, for example my will match MyProject in any column.To limit a match to one column use plus followed by the column name: +type:mytype will only match in the Type column. Column names also match on substring: +ty:mytypeDeselect the checkbox to turn off the filter without losing your values. |
 Active help Active help |
Click help  on the lower right corner to display the active panel's help (Context-sensitive help) in your default browser. on the lower right corner to display the active panel's help (Context-sensitive help) in your default browser. |
 , which
displays the features available on that node.
, which
displays the features available on that node.