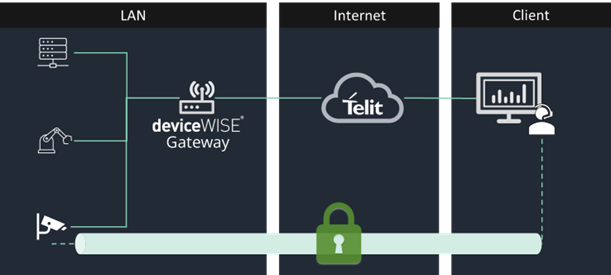
Usage of SRA (Secure Remote Access)
This application allows a user to access their internal network via deviceWISE Gateway. It establishes a VPN connection between the client host and the deviceWISE Gateway. The gateway acts as a network switch to enable connectivity between the client and the assets in the internal network.
Prerequisites
-
Supported Gateway Platforms: Linux-X64-Generic, Linux-X32-Generic, Linux ARM64 Generic, Teltonika
-
Supported client platforms: Windows
-
Install OpenVPN server on the gateway (Command example: sudo apt install openvpn bridge-utils)
-
Install dwopenvpn.pkg package to the gateway. Click here to understand more about How to add a Package to Gateway.
-
Add the OpenVPN - SRA license to the gateway. Click here to understand more about How to Add a License to Gateway.
-
Connect Gateway to Telit IoT Portal using the TR50 settings tab. Click here to understand more about How to connect to IoT Portal.
-
Go to the Telit IoT Portal and define a new Tunnel in the Thing Definition of the gateway.
-
Type in any tunnel key and name. For example: sra and SRA Tunnel respectively.
-
Select SRA protocol.
-
Port 1194.
-
Add the following metadata in JSON format:
{ "bridge": "br0", "bridge_begin_ip": "192.168.1.240", "bridge_end_ip": "192.168.1.250", "bridge_iface": "enp5s0", "bridge_ip": "192.168.2.7", "bridge_mask": "255.255.252.0", "dev": "tap0", "ifconfig-pool-persist": "ipp.txt", "keepalive": "10 120", "local": "127.0.0.1", "log-append": "/var/log/openvpn/openvpn.log", "management": "127.0.0.1 7000", "port": "1194", "proto": "tcp", "status": "/var/log/openvpn/openvpn-status.log", "verb": "3" } -
Configuration Parameters
| Name | Value | Description |
|---|---|---|
| bridge * | br0 | Bridge name. |
| bridge_begin_ip | Start IP range in the bridge subnet to allocate to connecting clients. | |
| bridge_end_ip | End IP range in the bridge subnet to allocate to connecting clients. | |
| bridge_iface | Physical interface to be bridged. | |
| bridge_ip | Physical interface IP. | |
| bridge_mask | Physical interface mask. | |
| dev * | tap0 | Virtual interface bridged with the physical interface |
| ifconfig-pool-persist * | ipp.txt | File to maintain a record of client <-> virtual IP address associations. If OpenVPN goes down or is restarted, reconnecting clients can be assigned the same virtual IP address from the pool that was previously assigned. |
| keepalive | 10 120 | Causes ping-like messages to be sent back and forth over the link so that each side knows when the other side has gone down. For example, ping every 10 seconds, assume that remote peer is down if no ping received during a 120 second period. |
| local | 127.0.0.1 | Local IP address where OpenVPN should listen on. |
| log-append | /var/log/openvpn/openvpn.log | File to append logs on OpenVPN startup. |
| management | 127.0.0.1 7000 | |
| port * | 1194 | |
| proto * | tcp | TCP or UDP server. |
| status | /var/log/openvpn/openvpn-status.log | File to output a short status file showing current connections, truncated, and rewritten every minute. |
| verb | 3 |
Level of log file verbosity
|
| *It is not recommended to change the values of this key. If values are altered, the provided step by step wont work properly. | ||
Preparing the Client
To prepare the Client, install the latest Telit Secure Remote Access Client app.
-
Open the SRA application.
.png)
-
Log-in using Telit IoT Portal credentials.
-
At the dropdown, select the instance where to log into.
If MFA is enabled, it is possible to access the application. A pop-up will appear requesting the code provided by your Authenticator app.
_402x312.png)
It is possible to switch organizations using the dropdown at the top right of the page.
-
Select the desired gateway, click on Open and then Connect.
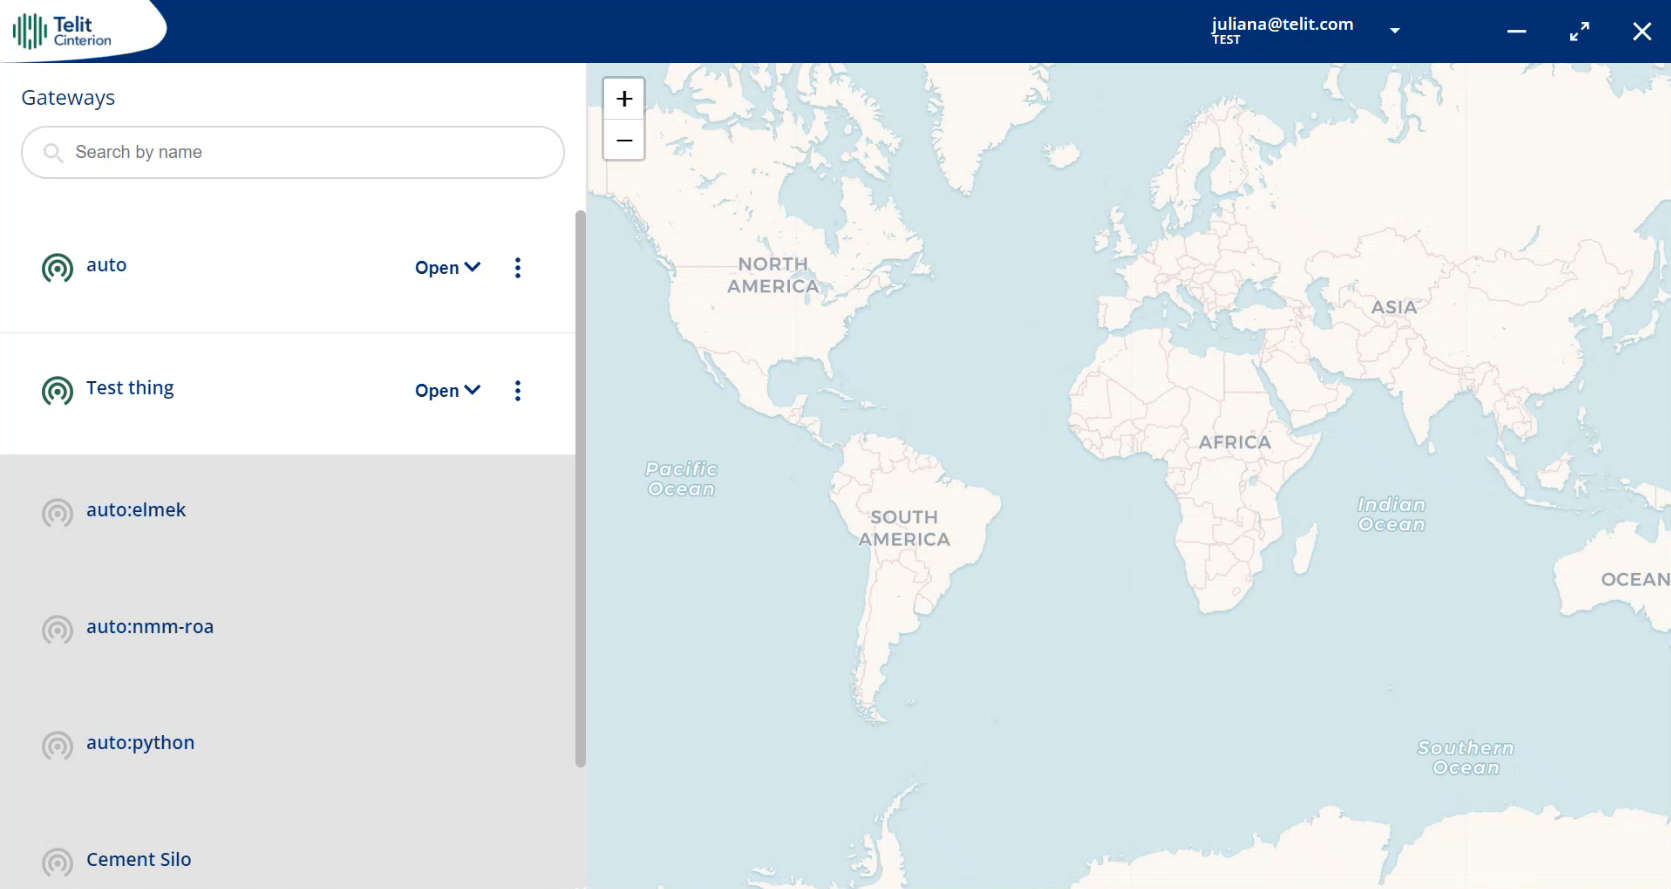
-
The Gateway will show a red circle, which means that it is disconnected. Once the Connect button is clicked, the color will change in the order that follows. Red is Disconnected; Yellow indicates Connecting; Green means Connected.
-
-
Once a connection is established, as the last status shows above, one IP address will be assigned to the client, and information about the exchanged bytes will be shown.
-
To access the Logs, click on the dropdown menu, identified by the logged email that is on the top left corner. Click on the Logs option and a pop-up with a detailed OpenVPN Process Log will appear. It is possible to copy all of the logs clicking on the "Copy" button. To close the pop-up click ESC or just anywhere else on the screen.
_432x97.png)
_428x103.png)
_429x131.png)
_429x120.png)
When the tunnel connection is established, the client has network access to the gateway's local network. You can test this by executing a ping.
It is possible to Launch the deviceWISE Tunnel Manager from the SRA application. To do that, you will need to:
-
Click on the 3 dot icon at the top right corner of the desired gateway and click on the "Launch Tunnel Manager" option.
.png)
-
The application will open with all of the available ports defined within the Thing Definition. It will be possible to open or close specified ports.
.png)
It is possible to Launch the deviceWISE Workbench from the SRA application. To do that, you will need to:
-
Click on the 3 dot icon at the top right corner of the desired gateway and click on the "Launch dW-Workbench"
-
The Workbench will then be opened, providing direct access to the devices and their management.