After the Tunnel Manager is started, it will display the list of user-defined tunnels from the gateway's thing definition.
Each of the tunnels is in the CLOSED state by default. To open a tunnel, follow these steps:
- Click on the Tunnels Tab while Viewing a Thing. For more information see,
Thing
Tunnels
- Click Launch tunnel manager to
open Tunnel manager
- Click on the
corresponding OPEN button of the
tunnel you want to open
For example, SSH
The tunnel's information is updated, based on ability to connect to the Tunnel Router and the gateway's tunnel server application.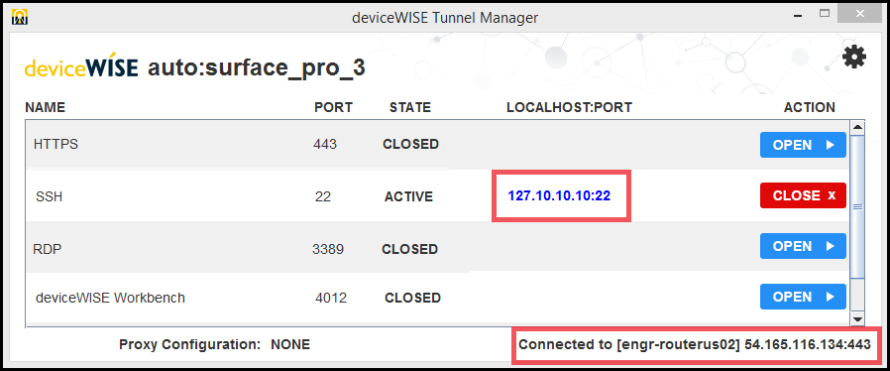
The sequence of operation that occurs includes:- When you click OPEN, the button will change from OPEN to a disabled CLOSE button.
- The Tunnel Router used for the tunnel will be displayed in the lower right portion of the window.
- While the tunnel is opening, its state will change from CLOSED to any of the following: NEW, AUTHORIZING, OPENING, OPEN, ACTIVE, and FAILED, and will continue to change as the state of the tunnel changes.
- When the state is not in an OPEN, ACTIVE, or FAILED state, the CLOSE button will remain disabled.
- When the state changes to OPEN, ACTIVE or FAILED state, the CLOSE button will become available.
When the state changes to OPEN, the LOCALHOST: PORT value appears.
These are the IP address and port values to use in the client application to connect, using the tunnel, to the server application.When there are tunnels established, the Tunnel Manager periodically sends API calls (tunnel history) to retrieve a list of tunnels that have been successfully opened on your account.
- Start the client application and enter the
localhost and port values from the Tunnel Manager page
into the corresponding parameters for the client
application.
For the example SSH tunnel, using the PuTTY application:
Note the IP address and port displayed, for this example: 127.10.10.10:22
Where:- 127.10.10.10 is the local IP address for the client application to use
- 22 is the local port for the client
application to use. The local port value may
match the value used when the tunnel was
defined, or it may have been given a different
value based on the Tunnel Manager's ability to
bind to that local port value.
- After the client application is finished using the
tunnel to access the server application on the gateway,
the tunnel can be closed by:
- Selecting the CLOSE button in the Tunnel Manager window for the tunnel.
- Exiting the Tunnel Manager by (these
options will close all tunnels that are not
already closed):
- Selecting the red X on the upper right-hand corner of the Tunnel Manager window
- Selecting the Tunnel Manager's application icon in the upper left-hand portion of the Tunnel Manager window and selecting Close
- Entering Alt + F4 when the Tunnel Manager window has focus
- Selecting the system tray Tunnel Manager, right-clicking, and then selecting Close window.