In the Management Portal, a Campaign is a series of operations confined to a set of things or connections. To create a campaign follow the procedure below:
- On Developer main screen in
the GENERAL group,
click Campaigns
The Campaigns screen appears - Click the New
campaign button
.png)
Add campaign screen appears. - Do one of the following:
- Click on Thing campaign, to run the Campaign on a set of things
- Click on Connection campaign, to run the Campaign on a
set of connections
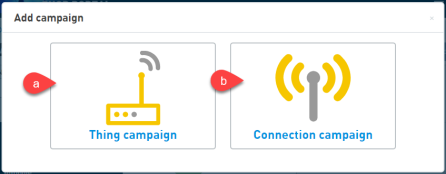 If CDP is not enabled in your Org profile, you will not see the Connection related options.
- Enter the Name
.png)
Right-click on the Start node to change the event type.
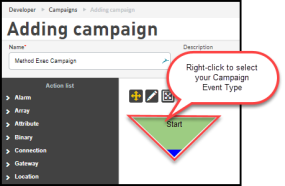
- Enter a
Description(Optional)
- Enter the Max in progress - The maximum number of things within the campaign that needs to execute simultaneously
- Select the Reporting Mode, which can be Off, On, or On failure. Default is On failure.
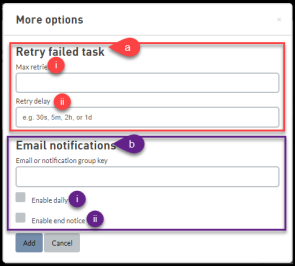
- Click More options to setup
automatic retry on failed tasks and setup email
notifications
- To configure automatic retry of the failed task (Retry failed task)
- Enter the email addresses or
notification group key to send email
notifications. For more information about
notification group key, see Notification
groups
- Enable daily - Check Enable daily to send daily updates about the campaign
- Enable end notice - Check Enable end notice to send an end of campaign notification
- Click Advanced(Optional) if you
want to define the Campaign using JSON. It is
recommended to use the Standard
option.
- Select the first action you want to perform when
the Campaign is executed. To select an action:
- Click on the Actions category name to expand and view the available actions. For more information on Cloud trigger actions, see Cloud Trigger Actions
- Click and hold while you drag the selected
action to the canvas.
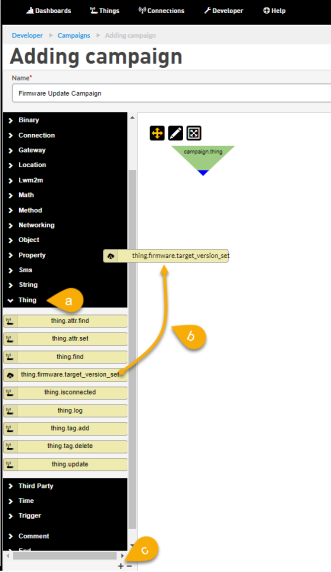
- Enter the details on the actions form. You can add
one or more actions to a campaign. Each action is able
to access the prior actions output. For more
information on entering the details in the Cloud action
form, see Cloud Trigger Actions.
- Click Add.
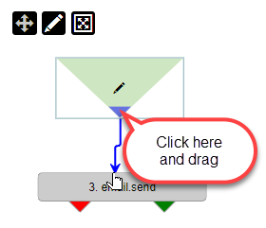
- Click and hold while you drag the arrows from
the colored edge to connect the nodes.
 Following are performed using the icons:
 Pan Mode -
Allows the canvas to be scrolled both
horizontally and vertically. While
in Pan mode, holding the CTRL
(control) key and clicking node(s) will
allow you to select/de-select multiple
nodes.
Pan Mode -
Allows the canvas to be scrolled both
horizontally and vertically. While
in Pan mode, holding the CTRL
(control) key and clicking node(s) will
allow you to select/de-select multiple
nodes.  Select Mode
- Allows selecting one or more nodes
for repositioning on the canvas.
The Select mode works in two
ways: when you drag from left to right,
any node that intersects your lasso
will be selected. When you drag from
right to left, only nodes that are
enclosed by your lasso will be
selected.
Select Mode
- Allows selecting one or more nodes
for repositioning on the canvas.
The Select mode works in two
ways: when you drag from left to right,
any node that intersects your lasso
will be selected. When you drag from
right to left, only nodes that are
enclosed by your lasso will be
selected.  Fit to
screen - Fit
the campaign to the screen
Fit to
screen - Fit
the campaign to the screen
-
Connect a Success node at the end of the route.
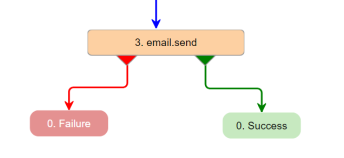
You should have at least one success route to save it.
-
Click Add in the bottom right corner to add the trigger.
When attempting to connect a route, drag it over the destination node until it turns grey. When the destination node turns grey it is aware of the route being connected to it. While the destination node is grey, release the mouse button to bind the route to it.
Related topics