The Network Configuration tab is used
to configure the node's network adapters and DNS
parameters.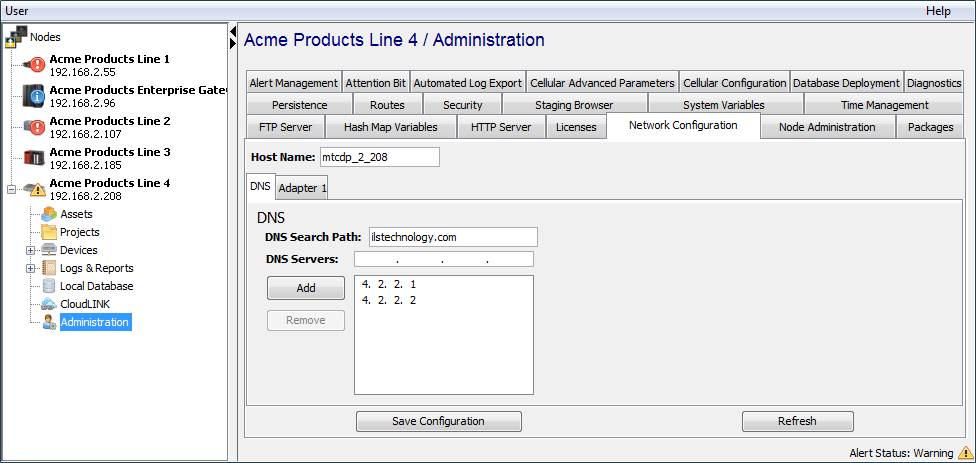
This tab is not available on all products. For products that rely on the underlying operating system tools for network configuration functions (for example, Enterprise Gateway products), the network configuration tasks are performed using the operating system tools. For information regarding the default configuration parameters for each hardware node type, see Installing product software.
The number of adapter tabs and parameters will vary, depending on the node's configuration and the product's features.
For Platforms running a Linux-based OS, Network Configuration is enabled through properties, which are read by deviceWISE on start-up.
To enable Network Configuration for these Platforms, the dwcore.platform.properties file must be modifed. This file is typically located in the /opt/dw/dwcore directory, although this path varies depending on the Platform. Refer the deviceWISE documentation relevant to your Platform for more information regarding this path.
First, remove the following lines from the dwcore.platform.properties file:
# Disable deviceWISE Network Management
linux.route.enable_controls=false
nomodule.1=Linux:Routes
os.network.disabled=true
Next, add one of the following to the dwcore.platform.properties file based on the Linux OS network configuration system used:
For Debian-style OS configurations, using the /etc/network/interfaces file:
linux.network.config=debianFor Red Hat style OS configurations using Sysconfig:
linux.network.config=debianFor OpenWRT-based Operating Systems, simply removing the lines above from the dwcore.platform.properties file will allow the deviceWISE runtime to automatically detect the network configuration system used by OpenWRT.
Note that at this time, the dwcore.platform.properties file must be modified after a deviceWISE Gateway upgrade.
Configuring the Host Name
The Host Name parameter is used to set the node's host name. The host name can be up to 15 characters long. The host name is separate from the node's node name and TR50 thing key.
Configuring the DNS parameters
The DNS tab is used to configure the Domain Name Service (DNS) parameters. The parameters are:
| Parameter | Description |
|---|---|
| DNS Search Path | The domain name appended to host
names when doing a host name look up
using the DNS servers. For example: if you add ilstechnology.com as the DNS Search Path, then a host name look up for "testnode" will attempt to resolve testnode.ilstechnology.com. |
| DNS Servers | The DNS servers to use to resolve
host name look ups. Enter the IP address of a DNS server and then select the Add button to add the server to the list of DNS servers. The Remove button is used to remove the selected DNS server from the list. |
After making changes to any parameters, select Save Configuration to have the changes take effect.
Configuring the network adapter parameters
The network adapter tabs displayed will vary based on the number of network adapters in the node. The parameters are:
| Parameter | Description |
|---|---|
| Enable Interface | Some products have a checkbox to enable the network interface for an adapter. |
| Automatically obtain address settings (DHCP) | Some products have the function to
use a Dynamic Host Configuration
Protocol (DHCP) server to obtain the IP
address for a network adapter. If this function is selected, then the node's IP address is obtained from the DHCP server. |
| Manually configure address | To configure the node's network parameters, select this function. |
| IP Address | The IP address for this adapter. |
| Subnet Mask | The subnet mask used to identify the subnetwork for the adapter. |
| Default Gateway | The IP address of the network
gateway that routes the network traffic
to another network segment. When configuring a node that uses both an Ethernet and a cellular connection, review the information in the Ethernet and cellular communication routes section. |
After making changes to any parameters, select Save
Configuration to have the changes take effect.
Changing an IP address
When you change an adapter's IP address and save the changes, the connection from the Workbench will be ended. Will you need to scan the node using the new IP address. For more information, see Scanning for local or remote nodes.
Configuring the MELSOFT connection
For Mitsubishi MESInterface IT nodes, there is a checkbox parameter that enables the programming of the Mitsubishi CPU via the Ethernet port on the Q12DCCPU-V.
In order for this feature to take effect, follow these steps:
- From the Network Configuration
tab, select Enable MELSOFT
connection.
- If there are no other changes, select Save
Configuration.
- Reset the CCPU module as follows:
- Open the cover at the top of the QCPU to
expose the LED settings and controls for the
module.
On the Reset panel, the reset toggle switch should be in the middle position. - Move the reset switch from the middle position to the left position, and then hold 2 seconds.
- Return the reset switch to the middle
position.
This will reset the QPCU and the CCPU in the rack. The CCPU will go through a start up sequence.
- Open the cover at the top of the QCPU to
expose the LED settings and controls for the
module.
- Start the MELSOFT GX Developer or GX Works2 (or
other programming software), and go to the
Transfer Setup window.
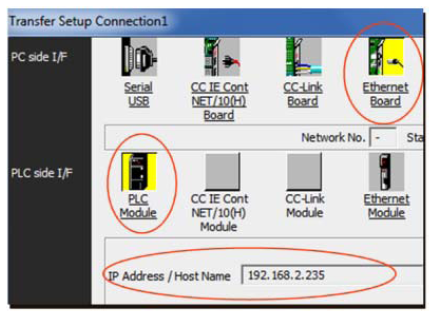
- Next to PC side I/F, select Ethernet Board.
- Next to PLC side I/F,
select PLC module, and then
make sure the IP address of CCPU matches the IP
address of the node.
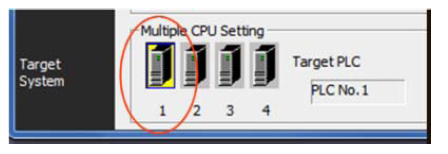
- At the bottom of the Transfer Setup window, next to Target System, select the appropriate slot on the PLC. Usually PLC 1.
- Select Connection Test.
- A message appears telling you if the connection to the node was successful or not. Select OK.
- If the connection was successful, select OK.